New Canvas
This describes how to put a new canvas (as supplied via
matts-soft-tops.co.uk) on a 2007 Eriba Puck 230GT. It shows a brute
force and ignorance way and the right way! Read all the blog before
starting.
Step 1 - Remove 3 clips at each end of roof

Step 3 - Untie outer cord, canvas should now be free at the bottom, now for the top channel. (Replace the cord with a new elasticated one when everything else is done. )

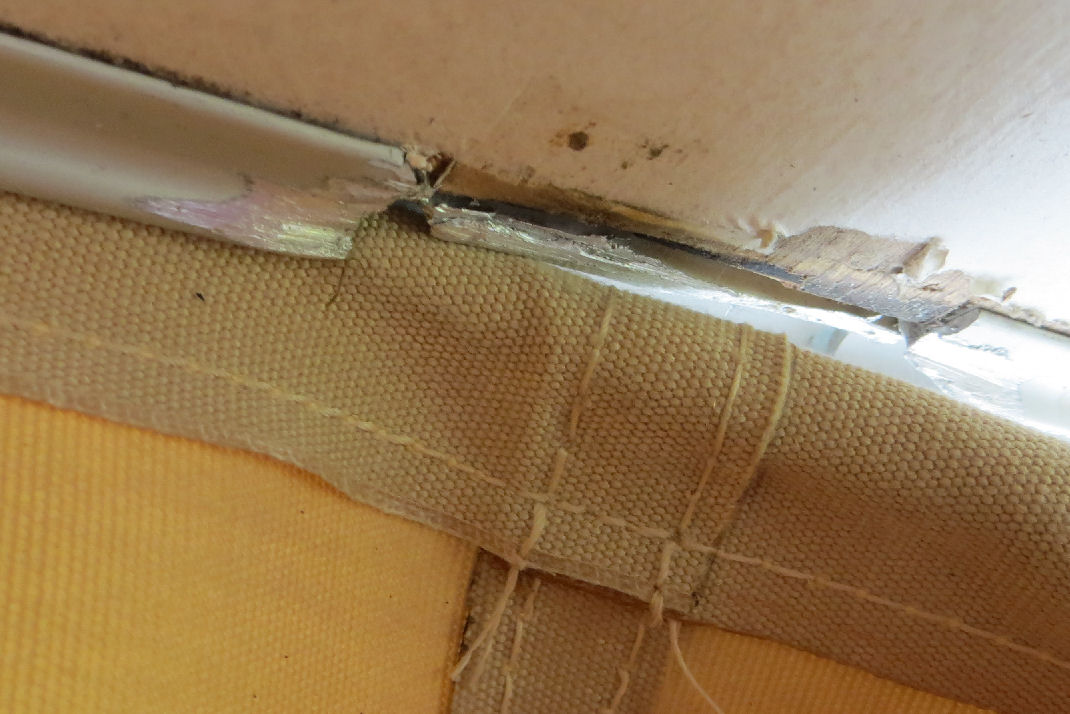
Step 4 - As I couldn't see another way, I decided to take out an inch of the inner top channel with a grinder. Only do this if you can't find the bulge in the top channel described below.

Step 5 - Use a screwdriver in the gap created to ease out the top bead in the canvas

Step 6 - Cut the bead and the canvas. I suspect there was a gap in the bead somewhere which would obviate the need to cut it but I couldn't find it. Anyway as the old canvas was destined for the bin it didn't seem to matter. Slide out the old canvas.

Step 7 - This is the top channel bulge that I discovered too late. This is what you need to find! As seen from below and after the canvas had been removed. This is where the canvas should be slid out and where the new one should be slid in.

Step 8 - Take the opportunity to clean the roof and the metal scissor supports before fitting the new canvas. Find the gap in the top bead, pinch it to flatten the canvas and feed one side into the top channel - preferably into the bulge shown above but into the gap created with the grinder if you can't find it.

Step 9 - The canvas supplied has four stiched joins - these won't go into the channel. The original has no joins.

Step 10 - Use a sharp scalpel to remove the overlapping material as shown, the cut join sits nicely in the channel as shown.

Step 11 - Feed all the canvas into the channel. This is really hard work done alone - I know! Two people would make it so much easier.

Step 12 - If you butched the channel with a grinder you can cover up your handiwork with a strip of gaffer tape before your wife sees it.

Step 13 - Screw the two lower channels back to trap the lower bead. This should be easy but because there are seams overlapping the lower beaded area it is well nigh impossible to get it all to go together again. Again, the Eriba canvas has no seams in this area. So a hard slog and some of the 24 channel fixing screws had to be missed off as the alignment was out due to build up of material. Particularly bad at the corners. Tried drilling new pilot holes but it's into hard steel so no chance.
On reflection I should have taken a scalpel to the four vertical joins as I did on the upper beading, would have made a big difference I think.
Step 14 - Re-insert the plastic insert and add the
six plastic brackets.To introduce the insert use a blunt knife to guide
the top edge into the channel. With a bit of practice and manual
dexterity it's possible to make rapid progress - apart from at the
corners where a large flat bladed screwdriver can be used to push it
into the grove.
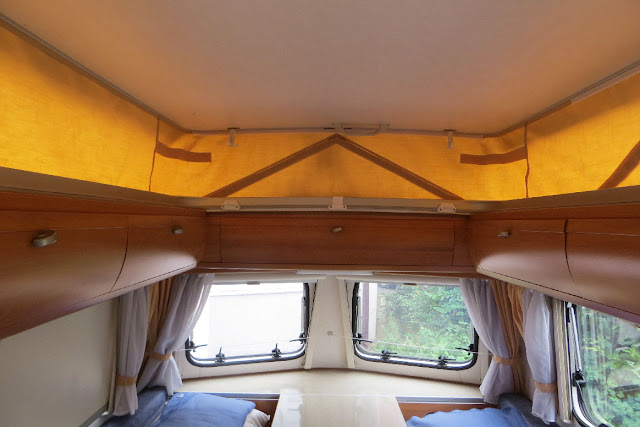
Step 15 - Admire the results.
Geo Meadows 4th Oct 2017
Step 1 - Remove 3 clips at each end of roof

Step
2 - Remove plastic insert, remove 24 revealed screws, remove two lower
channel pieces making sure you mark them so that they go back the same
way or the screwholes may not line up.

Step 3 - Untie outer cord, canvas should now be free at the bottom, now for the top channel. (Replace the cord with a new elasticated one when everything else is done. )

Step 4 - As I couldn't see another way, I decided to take out an inch of the inner top channel with a grinder. Only do this if you can't find the bulge in the top channel described below.

Step 5 - Use a screwdriver in the gap created to ease out the top bead in the canvas

Step 6 - Cut the bead and the canvas. I suspect there was a gap in the bead somewhere which would obviate the need to cut it but I couldn't find it. Anyway as the old canvas was destined for the bin it didn't seem to matter. Slide out the old canvas.

Step 7 - This is the top channel bulge that I discovered too late. This is what you need to find! As seen from below and after the canvas had been removed. This is where the canvas should be slid out and where the new one should be slid in.

Step 8 - Take the opportunity to clean the roof and the metal scissor supports before fitting the new canvas. Find the gap in the top bead, pinch it to flatten the canvas and feed one side into the top channel - preferably into the bulge shown above but into the gap created with the grinder if you can't find it.

Step 9 - The canvas supplied has four stiched joins - these won't go into the channel. The original has no joins.
Step 10 - Use a sharp scalpel to remove the overlapping material as shown, the cut join sits nicely in the channel as shown.

Step 11 - Feed all the canvas into the channel. This is really hard work done alone - I know! Two people would make it so much easier.

Step 12 - If you butched the channel with a grinder you can cover up your handiwork with a strip of gaffer tape before your wife sees it.

Step 13 - Screw the two lower channels back to trap the lower bead. This should be easy but because there are seams overlapping the lower beaded area it is well nigh impossible to get it all to go together again. Again, the Eriba canvas has no seams in this area. So a hard slog and some of the 24 channel fixing screws had to be missed off as the alignment was out due to build up of material. Particularly bad at the corners. Tried drilling new pilot holes but it's into hard steel so no chance.
On reflection I should have taken a scalpel to the four vertical joins as I did on the upper beading, would have made a big difference I think.
 | |
| Extra material extending into bead section makes things difficult |
Step 15 - Admire the results.

Geo Meadows 4th Oct 2017
Comments
Post a Comment